A fixed-height kitchen in a multi-generational home creates daily friction and exclusion. An electric adjustable worktop is the key to transforming it into a space of shared independence.
- It provides essential under-counter knee clearance for wheelchair users without compromising a comfortable standing height for others.
- Success depends on a holistic approach: the worktop’s material weight, the design of its flexible plumbing, and a well-planned installation are just as critical as the motor itself.
Recommendation: Your first step is to assess your family’s daily « ergonomic clashes » to define your true needs before looking at specific products.
In a bustling multi-generational UK home, the kitchen is the heart. It’s where stories are shared over a cup of tea, homework is done under a watchful eye, and family recipes are passed down. But for many, this central hub is a place of silent compromise and daily frustration. A standard, fixed-height worktop is an invisible barrier, creating an ergonomic conflict: a height that’s comfortable for a standing adult is completely inaccessible for a family member in a wheelchair, and often too high for a child eager to help.
The common response is to look for simple accessibility aids, but these often only solve one person’s problem, further segmenting the space. We are told these solutions are complex and expensive, focusing on the mechanics rather than the human outcome. But what if the goal wasn’t just to accommodate a disability, but to achieve true ergonomic harmony for the entire family? What if the conversation shifted from the cost of a mechanism to the value of an investment in togetherness?
This is the promise of a thoughtfully integrated electric adjustable worktop. It’s not just about a surface that moves up and down; it’s the engineering centerpiece that allows a kitchen to become a truly dynamic and inclusive environment. This guide will walk you through the critical considerations—from funding and materials to plumbing and installation—that turn a simple product into a catalyst for shared independence in your home.
To help you navigate this journey, this article breaks down the essential technical and practical questions. Explore the full picture to understand how these systems create a kitchen that works for everyone.
Contents: How Electric Worktops Create a Kitchen for Everyone
- Why Do Electrically Adjustable Worktops Cost More Than Manual Options?
- How to Connect a Sink to a Height-Adjustable Worktop Without Restricting Movement?
- Solid Surface vs Laminate: Which Worktop Material Suits Height-Adjustable Systems Better?
- The Weight Overload Mistake That Breaks Adjustable Worktop Motors
- When Should You Schedule Adjustable Worktop Installation to Keep the Kitchen Functional?
- Why Does 700mm Knee Clearance Under Worktops Transform Kitchen Independence?
- Why Do Pull-Down Baskets Have Lower Weight Limits Than Standard Shelves?
- What Kitchen Layout Works Best for a Full-Time Wheelchair User?
Why Do Electrically Adjustable Worktops Cost More Than Manual Options?
The higher initial cost of electric systems compared to manual crank-operated or fixed-height options can seem daunting. However, this price reflects a significant difference in engineering, safety, and ultimate usability. An electric system incorporates a powerful motor, robust lifting columns (actuators), a control unit, and integrated safety features like anti-collision sensors. These components are designed for smooth, effortless adjustment at the touch of a button, empowering users with limited strength or dexterity to adapt the kitchen to their needs independently.
This isn’t just a convenience; it’s a fundamental part of creating a space that promotes autonomy. For UK homeowners, it’s crucial to reframe this as a long-term investment in togetherness rather than a simple product expense. The cost can often be offset by specific UK-based funding and tax relief schemes. The Disabled Facilities Grant (DFG), for instance, provides local council funding for home adaptations. The UK government’s commitment to this is significant, with allocations for the DFG fund in England reaching £711 million for the 2025-26 period.
Furthermore, many components of an accessible kitchen, including the worktop lift system itself, may be eligible for VAT relief if they are being installed for a disabled person’s domestic use. This can reduce the final cost by a substantial 20%. Navigating these applications requires coordination, but it makes a high-quality electric system a much more attainable goal for many families, transforming a significant expense into a manageable and life-changing investment.
How to Connect a Sink to a Height-Adjustable Worktop Without Restricting Movement?
One of the most critical—and often overlooked—aspects of installing an adjustable worktop with a sink is the plumbing. A standard, rigid pipework setup would be sheared apart the first time the worktop moves. The solution lies in creating a ‘service loop’ with specialist flexible plumbing, a prime example of the thoughtful engineering of care required for a successful installation.
This process is not a standard DIY task and requires a qualified plumber with experience in accessible kitchens. As detailed in best practices for UK accessible kitchens, the installation uses WRAS-approved braided steel hoses for the hot and cold water supply. For the waste, a concertina-style flexible trap is used. This component is specifically designed to compress and extend smoothly over the worktop’s full range of motion—typically around 230mm—without kinking, leaking, or causing blockages. The plumber must calculate the precise length of these flexible connections to create a ‘service loop’ that has enough slack to move freely but not so much that it gets tangled or caught.
While these specialised components and the skilled labour required add to the overall project cost, they are non-negotiable for safety and long-term functionality. Attempting to cut corners here will inevitably lead to leaks, damage, and costly future repairs. A correctly installed flexible plumbing system is the hidden hero that ensures the ‘dynamic kitchen’ remains fully functional at every height.
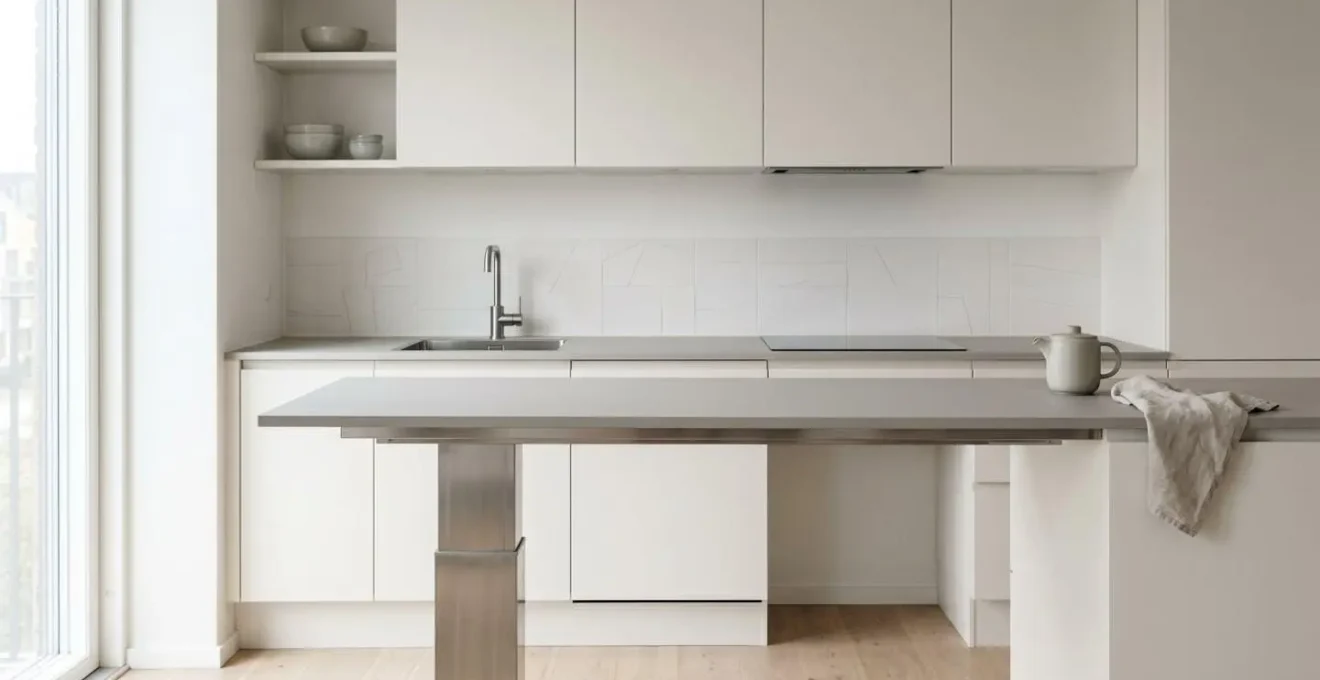
Solid Surface vs Laminate: Which Worktop Material Suits Height-Adjustable Systems Better?
Choosing the right worktop material is about more than just aesthetics; it’s a critical decision that directly impacts the performance and longevity of the lifting mechanism. The motor and frame of an adjustable system have a maximum payload capacity. This capacity must account for not only the items you place on the worktop but also the dead weight of the worktop material itself, plus any integrated appliances like a sink or hob.
Heavier materials like 20mm quartz or granite can consume a significant portion of the system’s lifting power before a single plate is placed on them. This reduces the ‘usable payload’ for everyday items and can put unnecessary strain on the motor. Lighter materials are therefore a more strategic choice for adjustable systems. A common specification for electric frames in the UK is a 100 kg total loading capacity (including the worktop), which highlights how crucial material weight is in the overall calculation.
This comparative analysis shows why lighter options are generally recommended for height-adjustable systems in UK homes.
| Material Type | Approximate Weight per Linear Metre (1500mm x 600mm) | Impact on System Payload | Repairability |
|---|---|---|---|
| 22mm Laminate (UK standard) | 18-22 kg | Lighter material leaves more capacity for items and equipment | Difficult – chips and scratches often permanent |
| 12mm Solid Surface (e.g., Corian) | 14-17 kg | Lightest option maximizes usable payload capacity | Excellent – can be repaired in-situ by certified UK fabricators |
| Note: Payload calculations must include worktop weight, sink (when filled), and everyday items. Most electric systems in the UK market have total capacity limits of 100-150 kg. | |||
While standard laminate is a cost-effective and light option, its poor repairability can be a drawback in a high-use family kitchen. A 12mm solid surface, though more expensive, often represents the ideal balance. It is the lightest option, thereby maximising the usable payload, and its ability to be seamlessly repaired in-situ by certified UK fabricators makes it a durable, long-term investment.
The Weight Overload Mistake That Breaks Adjustable Worktop Motors
The single most common cause of failure in electric adjustable worktops is motor strain caused by exceeding the weight capacity. This often happens not through a single heavy object, but through a gradual accumulation of weight and a misunderstanding of how the system is rated. Most users are unaware of the difference between static load (the weight the worktop can hold when stationary) and dynamic load (the weight it can safely lift and lower). The advertised capacity almost always refers to the dynamic load.
As experts from Eureka Ergonomic highlight in their guide, this is the most critical metric for performance.
Dynamic load capacity is the amount of weight a height-adjustable desk can safely and smoothly lift and lower. This is the more important, real-world metric for any sit-stand workstation.
– Eureka Ergonomic, Standing Desk Load Capacity Guide
To protect your investment, you must manage the total payload proactively. This involves calculating the fixed weight of your worktop and sink, and then remaining mindful of the variable items added daily. A full sink of water alone can add 8-10 kg. To prevent long-term motor strain, it’s wise to maintain a safety buffer of around 20% below the maximum dynamic capacity. It’s also vital to distribute weight as evenly as possible to avoid creating torque stress on the lifting actuators.
- Calculate static weight: Include the worktop material, sink, and any fixed appliances.
- Account for a filled sink: A standard UK sink can hold 8-10 kg of water.
- Estimate everyday items: A kettle, chopping boards, and utensil holders can easily add 5-10 kg.
- Never add heavy items during operation: The dynamic load rating is for moving a constant weight, not for lifting a weight that is simultaneously being increased.
- Distribute weight evenly: Placing a heavy mixer or stack of pans on one far end puts significant strain on the system.
When Should You Schedule Adjustable Worktop Installation to Keep the Kitchen Functional?
Coordinating the installation of an adjustable worktop requires careful planning to minimise disruption, especially in a home that relies on a functional kitchen. The timeline is often not solely at the homeowner’s discretion, particularly when external funding is involved. For those in England using a Disabled Facilities Grant (DFG), the process from initial assessment by an Occupational Therapist (OT) to final installation can span several months. This timeline is dictated by the local council’s approval process and the appointed contractor’s schedule.
During the installation itself, which typically takes 2-3 days, the kitchen will be largely out of commission. It’s essential to plan for this downtime by setting up a temporary kitchen area with a microwave and kettle in another room and arranging for pre-prepared or delivery meals. The installation process is best managed by splitting it into two distinct phases, known as ‘first fix’ and ‘second fix’. This staging approach is standard in UK construction and helps keep the rest of the home functional.
A successful installation requires careful project management. Following a structured plan ensures all parties—from the electrician to the OT—are coordinated, and your family experiences minimal disruption.
Your Action Plan for a Smooth Installation
- First Fix Coordination: Install the main support frame and run the necessary electrical wiring early in the renovation process, alongside other building services. Coordinate with your Part P-compliant electrician at this stage.
- Temporary Kitchen Setup: Before the second fix begins, relocate essential appliances like the microwave and kettle to another room and plan your meals for the 2-3 day installation period.
- Second Fix Execution: Schedule the fitting of the worktop surface, the connection of the motor and controls, and the final plumbing connections. This stage is where the kitchen becomes fully adapted.
- Plan for Downtime: Confirm with the plumber that the water supply to the kitchen can be isolated without affecting bathrooms or other essential services in the house.
- Final Inspection and Handover: Book a post-installation visit from the Occupational Therapist to verify the new system meets the user’s assessed needs and to get a full handover on its safe operation.
Why Does 700mm Knee Clearance Under Worktops Transform Kitchen Independence?
The concept of « knee clearance » might sound technical, but it is the single most transformative design element for a wheelchair user in the kitchen. A standard kitchen cabinet prevents a wheelchair user from getting close to the worktop. They are forced to approach from the side, leading to awkward twisting, over-reaching, and an unsafe working posture. This constant strain makes simple tasks like chopping vegetables or washing up difficult and tiring.
An open space beneath the worktop completely changes this dynamic. It allows a wheelchair user to roll their knees underneath the counter, just as a standing person stands with their feet under the edge. This enables them to get close and central to their task. The UK’s Building Regulations Approved Document M, which sets out standards for accessible dwellings, specifies a clear space of at least 700mm clearance above floor level for this purpose. An adjustable worktop is the ideal way to provide this clearance without sacrificing the worktop for standing users.
This proximity is not just about comfort; it’s about safety, control, and dignity. When a user can work directly over the surface, their shoulders are relaxed, their core is stable, and their arms operate within a natural, safe ‘reach arc’. They have better leverage for tasks like chopping and a reduced risk of spills or burns. This is the essence of shared independence: the worktop can be lowered to provide this essential 700mm clearance, and then raised back up for a standing family member, ensuring the space is perfectly ergonomic for everyone, every time.
Why Do Pull-Down Baskets Have Lower Weight Limits Than Standard Shelves?
While adjustable worktops solve the problem of accessible counter space, storage is the next challenge. Pull-down baskets, which bring the contents of a high wall cabinet down to a manageable height, are a popular solution. However, users often notice that their weight capacity is significantly lower than a standard fixed shelf. This isn’t a design flaw but a direct consequence of fundamental physics: the principle of leverage.
A fixed shelf supports weight directly through its vertical brackets and into the wall. The force is primarily a downward shear force. A pull-down basket, however, acts as a long lever arm when lowered. The further the weight is from the cabinet’s fixing point on the wall, the greater the rotational force (or ‘moment’) it exerts.
The further the weight is from the cabinet fixing point, the greater the force on the wall. A pull-down basket creates a long lever, multiplying the stress, whereas a fixed shelf supports weight directly below it.
– Engineering principle applied to accessible kitchen design
This multiplied force puts immense stress on the basket’s mechanism, the cabinet carcass, and crucially, the fixings into the wall. Therefore, manufacturers set lower weight limits (typically 5-10 kg) to ensure safe and durable operation. This is especially important in many modern UK homes which may feature ‘dot and dab’ plasterboard walls that offer less secure fixing points than solid brick. The key to using these systems effectively is to store lighter, frequently used items—like cereal boxes, mugs, or spices—in the pull-down units, while reserving heavier items like canned goods and jars for standard base cabinets.
Key takeaways
- An adjustable worktop is an investment in family harmony, not just an accessibility product; UK funding like DFGs can make it attainable.
- The success of an adjustable worktop hinges on technical details: lighter materials (like solid surface) preserve motor life, and specialist flexible plumbing is non-negotiable for sinks.
- True kitchen independence for a wheelchair user is unlocked by design principles like the 700mm knee clearance and a 1500mm turning circle, which are central to UK accessibility regulations.
What Kitchen Layout Works Best for a Full-Time Wheelchair User?
While an adjustable worktop is a powerful tool, its effectiveness is maximised when integrated into a well-planned kitchen layout. For a full-time wheelchair user, the primary consideration is clear, unobstructed floor space for manoeuvrability. UK building regulations recommend a minimum 1500mm diameter turning circle, which is essential for easily turning around without awkward three-point turns. This requirement often makes open L-shaped or wide galley layouts more suitable than tight, enclosed U-shaped kitchens commonly found in UK housing stock.
The best practice is to design the kitchen in ‘zones’ based on tasks, creating a logical workflow. This includes:
- Preparation Zone: A length of height-adjustable worktop with full knee clearance, forming the main workspace.
- Cooking Zone: A hob with front-mounted controls and a side-opening or ‘slide-and-hide’ oven mounted at an accessible height.
- Washing Zone: A shallow-bowl sink (around 150mm deep) set into an adjustable worktop, paired with easy-to-use lever taps.
The severe shortage of suitable housing makes adapting existing homes a critical necessity. A UK Parliament report highlighted that only 7% of homes in England have even basic accessibility features, and the waiting lists for accessible social housing can span decades. This stark reality underscores the importance of grant-funded adaptations to enable people to remain safely and independently in their own homes. A well-designed kitchen layout is not a luxury; it is a fundamental component of creating a home that works for every member of the family, now and in the future.
By thoughtfully combining the right components, technology, and layout, you can create a kitchen that is more than just a room. It becomes a true family hub, a place of shared independence and connection, proving that the best design is the one that brings everyone together. The next step is to begin the conversation within your own family and start planning for a more inclusive future.