The best accessible kitchen layout isn’t a specific shape (U, L, or galley), but a dynamic ‘workflow cockpit’ designed around the seated user.
- Functionality comes from strategic clearances and the relationship between zones, not just lowered surfaces.
- Safety and independence depend on creating seamless horizontal transfer paths for hot and heavy items.
Recommendation: Shift your focus from simply meeting regulations to designing an ergonomic system that empowers the user, treating the kitchen as a personalised, high-efficiency workspace.
For a UK family redesigning a home for a full-time wheelchair user, the kitchen presents the greatest challenge and the most significant opportunity. Standard advice often revolves around meeting the minimums of building regulations, focusing on wider doorways and lowered worktops. While essential, this approach treats accessibility as a checklist, often resulting in a space that is technically compliant but functionally awkward and devoid of joy. It answers the « what » but ignores the « how » of daily kitchen life. Many designs achieve basic access but fail to create an environment where a person can prepare a meal with confidence, safety, and independence.
The common solutions—providing a bit of knee space here, a low-level oven there—are disconnected elements. They don’t form a cohesive system. The real frustration for many wheelchair users isn’t just about reaching a shelf; it’s about the exhausting and often dangerous process of navigating between poorly positioned appliances, lifting heavy pots from unsafe heights, and struggling with storage that wasn’t truly designed for a seated posture. The secret to a truly successful accessible kitchen lies in a radical shift in perspective. What if, instead of just an ‘accessible room’, we designed the kitchen as a highly efficient, ergonomic ‘workflow cockpit’ tailored to the individual?
This approach moves beyond static dimensions to focus on dynamic movement and flow. It’s about creating a space where the sink, hob, oven, and key storage are arranged not just within reach, but in a logical sequence that minimises movement and maximises safety. This guide will walk you through the core principles of designing this ‘workflow cockpit’, transforming each key area of your kitchen from a simple compliant feature into an integrated part of a system that fosters true independence and makes cooking a pleasure, not a chore.
This article provides a detailed roadmap for creating a kitchen that is not only accessible but also empowering for a full-time wheelchair user. We will explore the critical design details that make all the difference, from foundational clearances to advanced technological solutions.
Summary: Designing a Kitchen for a Full-Time Wheelchair User
- Why Does 700mm Knee Clearance Under Worktops Transform Kitchen Independence?
- How to Position Your Oven to Avoid Dangerous Reaching from a Wheelchair?
- Pull-Down Baskets vs Standard Shelving: Which Makes Upper Cabinets Usable from a Wheelchair?
- The Island Placement Mistake That Blocks Wheelchair Movement in Kitchens
- When Should You Install Height-Adjustable Worktops Before They Become Essential?
- Why Is a 900mm Doorway the Minimum for Comfortable Wheelchair Access?
- How to Connect a Sink to a Height-Adjustable Worktop Without Restricting Movement?
- How Do Electrically Adjustable Worktops Accommodate Both Standing and Seated Users?
Why Does 700mm Knee Clearance Under Worktops Transform Kitchen Independence?
The single most transformative element in an accessible kitchen is not just a lowered worktop, but continuous, unobstructed knee space beneath it. This feature fundamentally changes the user’s relationship with the kitchen, converting it from a space to navigate *around* to a workspace to operate *within*. UK Building Regulations provide a starting point, specifying a clear space that is a minimum of 700mm high, 600mm deep, and 800mm wide under key areas like the hob and sink. However, the true magic happens when this concept is expanded.
Instead of creating isolated « stations, » a truly ergonomic design provides a continuous knee space along the primary work zone. This allows a seated user to glide effortlessly from the sink to the main preparation area and then to the hob without ever needing to pull back, turn, and reposition the wheelchair. This fluid movement is the cornerstone of an efficient ‘workflow cockpit’. It saves enormous physical effort, reduces the time taken to complete tasks, and significantly enhances safety by minimising complex manoeuvres while handling sharp utensils or hot pans.
To be effective, this zone must be thoughtfully designed. The underside of the hob and sink must be properly insulated to prevent any risk of burns to the user’s legs. The worktop itself should be of a standard or reduced depth to ensure that taps, controls, and the back of the work surface remain within easy reach from a seated position. By thinking of this space not as a void, but as an active « driving lane, » you shift the design from passive compliance to active empowerment, creating a primary work area that is as functional and comfortable for a wheelchair user as a traditional worktop is for a standing person.
How to Position Your Oven to Avoid Dangerous Reaching from a Wheelchair?
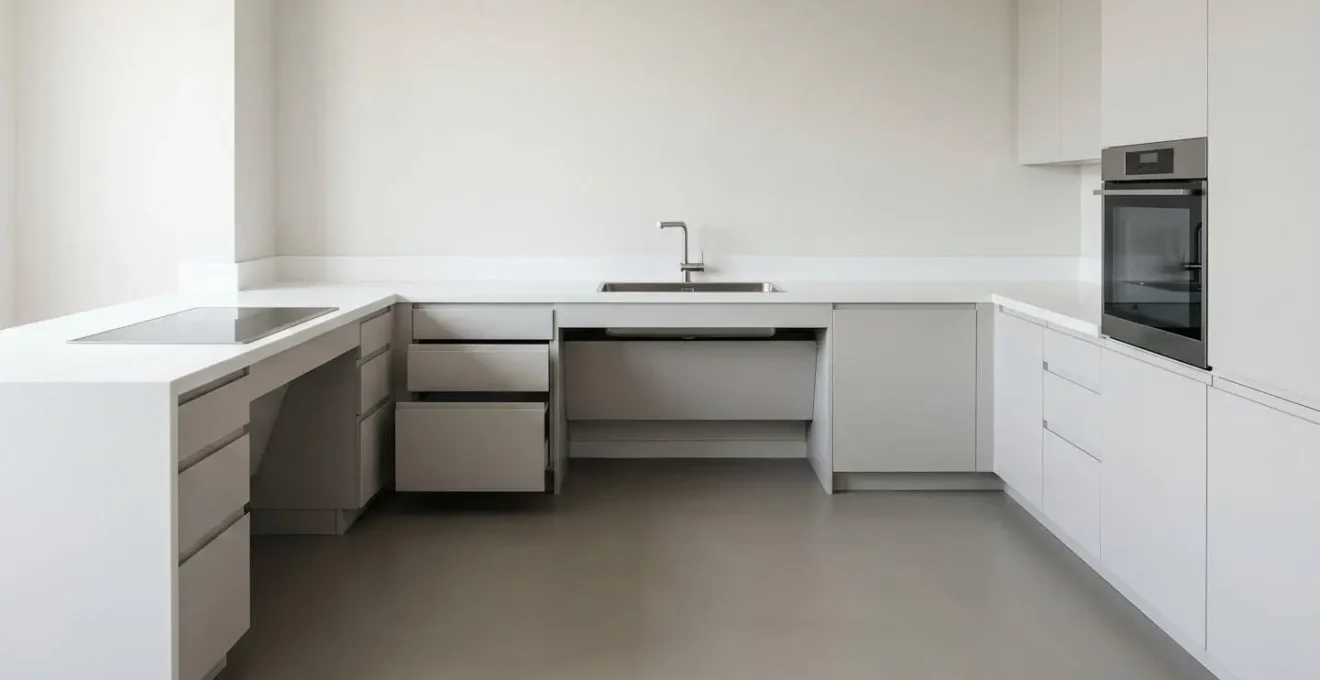
The oven is often the most hazardous appliance in a kitchen for a wheelchair user. Standard under-counter ovens are extremely dangerous, requiring a person to bend low and reach forward over a hot, open door. The solution is a wall-mounted oven, but its precise positioning is critical for safety and usability. The goal is to create a seamless, horizontal transfer path from the oven to an adjacent worktop, eliminating the need to lift heavy, hot dishes up or down.
The ideal placement is in a tall housing unit, with the oven’s base positioned at a height that allows the door to open safely above the user’s knees. More importantly, the middle oven shelf should align perfectly with the height of the adjacent worktop. This creates a crucial « safe landing zone »—a heat-resistant surface of at least 400mm width to one or both sides of the oven. This allows the user to slide a hot dish directly from the oven shelf onto the worktop without any lifting, drastically reducing the risk of spills and burns. This horizontal-only movement is a key principle of the ‘workflow cockpit’ design.
The choice of oven door is also vital. A standard pull-down door acts as a barrier, forcing the user to reach over it. A side-hinged door is a significant improvement, as it swings completely out of the way. The premium option is a « slide-and-hide » door, which retracts neatly underneath the oven cavity, providing the clearest, most direct access possible. This thoughtful integration of height, adjacency, and appliance mechanics is what turns a simple oven into a safe and independent cooking station.
As this image demonstrates, the combination of a side-opening door and an adjacent landing zone at the same height creates a zero-lift environment. The user can safely and easily slide items in and out of the oven, making the entire process more secure and less physically demanding. This principle of horizontal transfer is paramount.
Your Action Plan: Safe Oven Positioning Checklist
- Position the oven in a tall housing unit at approximately 760mm above floor level, ensuring the door opens safely above the wheelchair user’s knees.
- Install a heat-resistant « safe landing zone » (minimum 400mm width) directly adjacent to the oven at the exact same height as the middle oven shelf.
- Choose an oven with a side-hung door or a slide-and-hide mechanism to eliminate any physical barrier when open.
- Ensure the middle oven shelf is level with the adjacent worktop to facilitate smooth, horizontal transfer of hot items.
- Completely avoid under-worktop or freestanding ovens, which pose a significant burn risk due to the need for low bending and reaching.
Pull-Down Baskets vs Standard Shelving: Which Makes Upper Cabinets Usable from a Wheelchair?
Standard upper cabinets are largely unusable for a seated user. Even the lowest shelf is often too high for comfortable and safe access, rendering a significant portion of the kitchen’s storage capacity redundant. While the most accessible storage will always be in base units, specifically in deep drawers rather than cupboards, upper cabinets can be made functional with the right mechanisms. The key is understanding the user’s « reach envelope »—the area they can comfortably access without straining.
Fixed shelving, even if lowered, presents a challenge. The user must reach up and in, which can be difficult and unsafe, especially when retrieving heavier items like a stack of plates. This is where pull-down baskets and shelves become a game-changer. These mechanisms are mounted inside a standard wall cabinet and operate on a spring-loaded or gas-strut arm. With a light pull on a handle, the entire shelf unit swings down and forward, bringing the contents out of the cabinet and down to a manageable height in front of the user.
This completely alters the dynamic of reaching. Instead of reaching *up into* a space, the user brings the space *down to them*. This is not only more convenient but vastly safer, as it provides a clear view of all items and allows for a stable, two-handed grip when lifting. As design guidelines from specialists highlight, creating effective storage is about placing items within a specific vertical window. As noted by the experts at Best Online Cabinets in their « Expert Tips on Designing a Wheelchair Accessible Kitchen »:
A vast majority of wheelchair users can reach shelves that are 15 to 48 inches high, so storage located in the range of 20 to 44 inches is often the best for accessible kitchen layouts.
– Best Online Cabinets accessibility design guidelines, Expert Tips on Designing a Wheelchair Accessible Kitchen
Pull-down mechanisms effectively bring the contents of a 60-inch-high cabinet down into that optimal 20-44 inch zone. While they represent an added cost, their impact on the kitchen’s total usable storage and the user’s independence is profound, making them a worthwhile investment over standard, inaccessible shelving.
The Island Placement Mistake That Blocks Wheelchair Movement in Kitchens
A kitchen island can be a fantastic feature in an accessible kitchen, offering a 360-degree workspace with potential knee clearance on one or more sides. However, it can also be the single biggest mistake, turning a potentially spacious kitchen into an impassable obstacle course. The error lies not in having an island, but in failing to provide adequate clearance around it. For a wheelchair user, this space is not just for walking through; it’s for turning, reversing, and navigating safely.
Standard kitchen design often gets this wrong. UK accessibility standards provide clear, non-negotiable minimums for circulation paths. A straight path or « corridor » between two sets of units (e.g., between the island and the wall cabinets) must have a minimum clear width of 1200mm. This allows a wheelchair to pass through comfortably. However, the most critical dimension is the space required for a turning circle. A wheelchair needs a clear, unobstructed diameter of 1500mm to 1800mm to complete a 360-degree turn. Placing an island too close to other units can completely eliminate this vital manoeuvring space.
This forces the user into a series of awkward and inefficient three-point turns, just like a car in a tight parking spot. This isn’t just an inconvenience; it’s a fundamental design failure that disrupts the entire ‘workflow cockpit’. The placement of the island must therefore be planned meticulously to preserve these clearances, ensuring not just a straight path but also at least one major open area that accommodates the full turning circle. Thinking about circulation first is paramount.
This overhead perspective illustrates the concept perfectly. The island is an asset only when it’s surrounded by generous, well-planned circulation space. The layout must prioritise the user’s path of movement, ensuring that every part of the kitchen is not just reachable, but easily and safely navigable without obstruction. This is where an L-shaped or galley layout often proves more efficient in smaller spaces than a U-shape with a cramped island.
When Should You Install Height-Adjustable Worktops Before They Become Essential?
While fixed, lowered worktops are a common solution for wheelchair accessibility, they present a significant limitation: they are only comfortable for one person. In a multi-user household where both seated and standing individuals will use the kitchen, a fixed-height surface will always be a compromise. This is where height-adjustable worktops move from a luxury to a highly practical, inclusive solution. The question isn’t just about meeting a current need, but about future-proofing the home.
Installing height-adjustable sections of worktop is a proactive step that builds long-term flexibility into the kitchen. This is particularly wise if a family member has a progressive condition, or simply to accommodate visiting friends and family of varying heights and abilities. It ensures the kitchen remains a central, shared hub for everyone, rather than becoming a segregated space. The ability to change the surface height at the touch of a button allows a wheelchair user to work at their optimal ergonomic height, and then for a standing user to raise it to theirs.
This principle of adaptability is recognised within UK building standards as the gold standard for inclusive design. The official guidance recommends a system that provides both flexibility and the necessary clearance for a seated user. As stated in the guidelines that inform accessible design:
The worktop should be height adjustable with clear leg space underneath. This will enable a wheelchair user to work in the space but also allow someone standing to use the space too. The height can be adjusted between 760mm and 900mm.
– UK Building Regulations Approved Document M, Metric Data 10 – Kitchen Standards for Wheelchair Users
The best time to install these systems is during a major renovation, as it allows for the necessary electrical and plumbing work to be integrated seamlessly. While the initial investment is higher than for fixed worktops, it should be weighed against the long-term value it provides in terms of usability, inclusivity, and the property’s overall adaptability. It’s a decision to invest not just in accessibility, but in a truly shared family space for years to come.
Why Is a 900mm Doorway the Minimum for Comfortable Wheelchair Access?
The entrance to the kitchen is the first and most fundamental point of access. If the doorway is too narrow, the rest of the design, no matter how brilliant, is irrelevant. While UK building regulations specify a minimum clear opening width, experience shows that this minimum is often not sufficient for comfortable, long-term, independent use. A narrow doorway can lead to scraped knuckles, damaged door frames, and a constant, frustrating need for precise alignment every time one enters or leaves the room.
The standard recommendation for a comfortable passage is a door that is 900mm wide. It’s crucial to understand that a 900mm door leaf does not provide a 900mm clear opening. The door’s thickness and the doorstop reduce the usable space. A 900mm door typically provides a clear opening of around 850mm, which is considered a comfortable and practical width. This small extra margin of space compared to the absolute minimum makes a world of difference in daily life, allowing for easier passage, even when carrying items on one’s lap.
This wider standard is what many leading organisations advocate for. For instance, the 900mm door leaf providing approximately 850mm clear opening width is championed by UK disability charities like Scope and Habinteg as the gold standard. Opting for this wider dimension is not about over-engineering; it’s about acknowledging the reality of day-to-day use and prioritising ease and dignity over bare-minimum compliance. In a renovation project, widening a doorway is a relatively straightforward structural change that yields a massive return in usability and user comfort. It’s an investment in a frustration-free experience for the entire lifetime of the kitchen.
Furthermore, consider a pocket door or a sliding door. These eliminate the « swing space » a traditional hinged door requires, which can be a significant obstruction in a tight hallway or within the kitchen itself, further enhancing the clear circulation space.
How to Connect a Sink to a Height-Adjustable Worktop Without Restricting Movement?
A height-adjustable worktop is a powerful tool for inclusivity, but integrating a sink into one presents a specific technical challenge: how do you manage the water supply and waste pipes when the entire unit is designed to move vertically by 200mm or more? Standard, rigid plumbing would make this impossible. The solution lies in specialised flexible plumbing systems that are designed to move with the worktop.
These systems are a critical component that must be planned from the outset. Leading UK plumbing suppliers like McAlpine and Geberit offer products specifically for this purpose, including concertina-style flexible waste traps and long, braided steel supply hoses. These components are designed to expand and compress smoothly without kinking, leaking, or becoming detached. The installation requires a certified plumber who is experienced with these systems, as an improper connection can lead to catastrophic leaks that could damage the expensive lifting mechanisms and create a severe slip hazard—a critical safety concern.
A truly integrated solution goes beyond just the pipes. The best designs also incorporate a flexible silicone splashback. This strip is attached to the wall and the back of the worktop, compressing and expanding as the surface moves. It creates a seamless, hygienic seal that prevents water from splashing down behind the units, which is crucial for maintaining a clean and safe environment. For ultimate peace of mind, advanced systems can include wireless water shut-off sensors. A device like a Sure Stop switch can be installed to detect leaks and automatically shut off the entire water supply to the kitchen, providing an invaluable safety net for independent living.
As this detailed view shows, the solution is an elegant piece of engineering. The concertina waste and braided hoses provide the necessary give, ensuring a reliable connection at any height. It is this hidden infrastructure that makes the visible magic of a height-adjustable sink possible and safe.
Key Takeaways
- Prioritise circulation: Ensure a minimum 1200mm corridor width and a 1500mm turning circle.
- Design for horizontal transfer: Align oven shelves with adjacent « safe landing zones » to eliminate lifting hot items.
- Maximise reach: Use pull-down mechanisms for upper cabinets and favour deep drawers over cupboards in base units.
How Do Electrically Adjustable Worktops Accommodate Both Standing and Seated Users?
Electrically adjustable worktops represent the pinnacle of inclusive kitchen design, creating a space that belongs equally to everyone in the household, regardless of their height or mobility. These systems use powerful, quiet electric motors to raise and lower entire sections of worktop, transforming the kitchen from a static environment into a dynamic, multi-user space. This technology allows a single kitchen to perfectly serve a full-time wheelchair user, a standing adult, and even a child helping with preparations.
The beauty of these systems lies in their simplicity of use and their intelligent features. Most systems, from brands like Linak and Granberg available in the UK, operate via simple up/down switches. More advanced models feature programmable memory functions. This allows different family members to save their preferred height setting, so the worktop can be adjusted to the perfect ergonomic level for each person with a single button press. This seamless adjustment, typically across a range from 760mm to 900mm according to UK accessible kitchen design standards, removes all compromise.
Safety is built-in. Modern systems include anti-collision sensors that automatically halt and slightly reverse the worktop’s movement if an obstacle is detected, protecting users, pets, or objects left underneath. This feature is crucial for creating a worry-free environment. The emotional value of such a system cannot be overstated. It sends a powerful message that the kitchen is a shared space for shared activities. A grandparent in a wheelchair can comfortably prepare vegetables at a seated height, working alongside a grandchild for whom the surface has been lowered, before another family member raises it to a full standing height for their task. It transforms the kitchen from a place of functional necessity into a hub of family connection and shared creation.
To truly create a kitchen that works for your family’s specific needs, the next logical step is to consult with a designer who specialises in accessible environments. They can help translate these principles into a concrete plan tailored to your space and budget.