In summary:
- Do not rely solely on a floor’s R-rating (e.g., R10); it is often insufficient for wet, barefoot areas like UK bathrooms.
- The UK Health and Safety Executive (HSE) benchmark is a Pendulum Test Value (PTV) of 36+ for low slip risk in wet conditions. Always request this value.
- For wheelchair durability, choose commercial-grade vinyl (20+ mil wear layer) or textured porcelain (PEI rating 4-5) with professional glue-down installation.
- Maintain slip resistance by using only pH-neutral cleaners. ‘Clean and shine’ products create a dangerously smooth film over time.
- Ensure all floor transitions are flush or meet UK Building Regulations Part M (max 15mm threshold) to prevent wheelchair casters from catching.
Selecting the right flooring for a home with a wheelchair user is a decision weighed down by a significant concern: safety. The fear of a fall, particularly in a high-risk area like a bathroom, can make the array of technical specifications and marketing terms feel overwhelming. You navigate a world of ‘anti-slip’ labels, textured surfaces, and various material options, all while a critical question looms: which choice is genuinely safe?
Many homeowners and even some installers fall back on the seemingly straightforward ‘R-rating’ system (from R9 to R13) as their primary guide. This is a common and understandable starting point. However, this system, originating from Germany for shod-foot factory environments, is a dangerously incomplete metric for a wet, barefoot UK bathroom. The assumption that a higher R-rating automatically equals safety is a widespread platitude that can lead to costly and hazardous mistakes. True safety lies beyond this single letter and number.
But what if the key to foolproof flooring selection wasn’t about deciphering the R-rating, but about understanding a more robust, real-world British standard? The true measure of slip resistance is the Pendulum Test Value (PTV), the benchmark used by the UK Health and Safety Executive (HSE). It measures how a floor actually performs when wet, accounting for the realities of a home environment. Understanding this distinction is the single most important factor in creating a genuinely safe space.
This guide will act as your technical consultant, translating complex standards into actionable knowledge. We will deconstruct why common ratings fail, show how to treat existing floors, compare the long-term durability of key materials for wheelchair use, and reveal the maintenance errors that can negate your safety efforts. By focusing on PTV, correct installation, and holistic risk assessment, you will be empowered to specify flooring with genuine confidence.
To navigate these critical considerations effectively, this article breaks down the essential technical knowledge and practical steps. The following sections will guide you through understanding true slip resistance, selecting durable materials, and avoiding common pitfalls to ensure long-term safety and accessibility.
Summary: A Technical Guide to Wheelchair-Safe Flooring Specifications
- Why Does an R10 Rating Not Guarantee Safety in a Wet Shower Area?
- How to Apply Anti-Slip Coating to Existing Tiles Without Retiling?
- Vinyl vs Textured Ceramic: Which Anti-Slip Flooring Lasts Longest in High-Traffic Hallways?
- The Cleaning Product Error That Makes Anti-Slip Floors Dangerously Smooth
- How to Create Seamless Floor Transitions Between Rooms for a Smooth Wheelchair Journey?
- Carpet, Vinyl or Cork: Which Flooring Reduces Fall Injuries Most?
- The Porcelain Tile Mistake That Makes Italian Showers Hazardous
- Which Room in Your Home Contains the Most Hidden Fall Hazards?
Why Does an R10 Rating Not Guarantee Safety in a Wet Shower Area?
Relying on an R10 rating for a wet shower area is a fundamental specification error. The ‘R’ or Ramp test is a German standard (DIN 51130) that measures slip resistance for workers in shoes on a lubricated ramp. It is not designed to assess the safety of barefoot users on a wet, soapy floor. The results are often dangerously misleading in a residential bathroom context. In fact, data from the UK Slip Resistance Group reveals that a significant number of these floors are not fit for purpose when tested under realistic conditions.
Case Study: The Pendulum Test vs. R-Ratings
The definitive UK standard for assessing slip risk is the Pendulum Test Value (PTV), as recommended by the Health and Safety Executive (HSE) and specified in British Standard BS 7976-2. This test simulates a heel striking a wet surface and provides a reliable measure of in-situ performance. For any walking surface considered to have a low slip potential, the HSE requires a minimum PTV of 36+. An R10 rating, however, typically only correlates to a PTV of 18-34 when wet. This falls squarely into the moderate or even high slip risk categories, making it unsuitable for areas with constant water and soap contamination like a shower. A study confirms that 32% of R10-rated floors tested failed to meet adequate slip resistance when wet, highlighting the unreliability of the R-rating alone for ensuring safety.
The discrepancy arises because the Pendulum Test accounts for real-world factors that the R-test ignores, such as the build-up of limescale, body fats, and cleaning product residues, all of which dramatically reduce a floor’s slip resistance over time. Therefore, specifying a floor for a wet room or bathroom must always be based on a verified PTV of 36 or higher, not on an R-rating.
How to Apply Anti-Slip Coating to Existing Tiles Without Retiling?
For existing ceramic or porcelain tile floors that present a slip hazard, applying a professional anti-slip treatment is a cost-effective solution that avoids the disruption of a full retile. These treatments are not merely coatings that sit on top of the tile; they are mild acid solutions that create a permanent change to the surface itself. They work through a process of micro-etching, creating thousands of microscopic, textured valleys and peaks on the tile’s surface.
This microscopic texture, invisible to the naked eye, functions like tyre treads. When the floor is wet, these tiny valleys channel water away from the point of contact, allowing the foot or a wheelchair tyre to make a solid connection with the now-grippy surface. The illustration below shows a close-up of how this chemical treatment fundamentally alters the tile’s surface to enhance grip.
As you can see, the process creates a durable, high-friction surface. However, the success of this treatment is entirely dependent on meticulous preparation and application. Standard household cleaning is insufficient to prepare the surface, and any remaining grease, soap scum, or polymer film from previous cleaners will prevent the treatment from working effectively. A deep, restorative clean is the mandatory first step.
Here are the professional steps for applying such a treatment:
- Step 1: Deep clean the tile surface to remove all dirt, grease, limescale, and polymer build-up from previous cleaning products.
- Step 2: Test the treatment in a small, inconspicuous area first to determine suitability and the required dwell time (typically 3-10 minutes).
- Step 3: Apply the treatment solution, such as Universeal Feel Safe, evenly across the surface in small, manageable sections.
- Step 4: Ensure the product remains active over the entire surface during the treatment time, adding more solution if it starts to dry.
- Step 5: Rinse the surface thoroughly with clean water after the specified dwell time and implement a proper maintenance regime to keep the micro-etched surface clean.
Vinyl vs Textured Ceramic: Which Anti-Slip Flooring Lasts Longest in High-Traffic Hallways?
When selecting flooring for high-traffic areas used by a wheelchair, long-term durability is as critical as initial slip resistance. Both textured porcelain tile and commercial-grade vinyl are excellent options, but their performance and lifespan are dictated by specific technical attributes that go far beyond their material type.
For porcelain tiles, durability is measured by the PEI (Porcelain Enamel Institute) rating, which indicates resistance to abrasion. For a high-traffic residential hallway with wheelchair use, a PEI rating of 4 or 5 is essential. While the tile surface itself is exceptionally hard-wearing, the grout lines are the weak point, requiring regular cleaning and eventual re-sealing to prevent degradation. Properly maintained, high-quality porcelain can have an exceptionally long lifespan.
For vinyl flooring, the single most important factor is the wear layer thickness. Residential-grade vinyl, with a thin 6-12 mil wear layer, will quickly degrade under the concentrated pressure of wheelchair wheels, losing its texture and safety properties within a few years. It is essential to specify commercial-grade sheet vinyl or Luxury Vinyl Tile (LVT) with a minimum 20 mil (0.5mm) wear layer. Furthermore, for LVT, a glue-down installation is mandatory; floating click-lock systems will fail at the joints under the stress of wheelchair traffic.
The following table, based on a comprehensive durability analysis, compares the key specifications for long-term performance under wheelchair use.
| Flooring Type | Lifespan (Wheelchair Use) | Wear Layer Requirement | Installation Method | Slip Resistance Maintenance |
|---|---|---|---|---|
| Commercial Sheet Vinyl | 15-20 years | 20+ mil wear layer | Glue-down, heat-welded seams | Maintains PTV 36+ throughout life if properly cleaned |
| Luxury Vinyl Tile (LVT) | 15-20 years | 20+ mil with SPC core | Glue-down only (floating fails) | Texture remains consistent over lifespan |
| Textured Porcelain Tile | 20+ years (longest) | PEI rating 4-5 | Thin-set with narrow grout lines | Surface texture permanent but grout requires maintenance |
| Residential-Grade Vinyl | 2-5 years (fails quickly) | 6-12 mil (insufficient) | Click-lock floating | Loses texture within 5 years under wheelchair traffic |
The Cleaning Product Error That Makes Anti-Slip Floors Dangerously Smooth
Investing in high-grade, slip-resistant flooring is rendered useless if the maintenance regime compromises its safety features. The most common and dangerous error is the use of improper cleaning products. Many standard household cleaners, especially ‘clean and shine’ formulations, contain acrylic polymers or soap-based agents. While they may leave a visually appealing sheen, they do so by depositing a thin, transparent film on the floor.
This polymer layer builds up over time, filling in the microscopic valleys of the floor’s textured surface. It effectively smooths over the very features designed to provide grip, creating a uniform, low-friction plane. This turns a once-safe, high-PTV floor into a hazardous surface, especially when wet. The floor’s PTV can drop significantly without any visible change, leading to a false sense of security.
To preserve the safety characteristics of anti-slip flooring, a strict cleaning protocol must be followed. It is imperative to avoid any product that promises to add a ‘shine’ or leaves behind any form of residue. Only products specifically designed for safety flooring, which clean without depositing a film, should be used.
The correct cleaning protocol involves:
- Using ONLY pH-neutral, non-film-forming detergents recommended by safety flooring manufacturers like Altro or Polyflor.
- AVOIDING all soap-based cleaners, acrylic polishes, and any combination products that promise a shiny finish.
- For limescale build-up in hard water areas, use only approved gel-based descalers, as harsh liquid acids can damage the flooring material itself.
- Establishing a regular cleaning schedule to prevent the build-up of organic matter and soap scum that can also reduce grip.
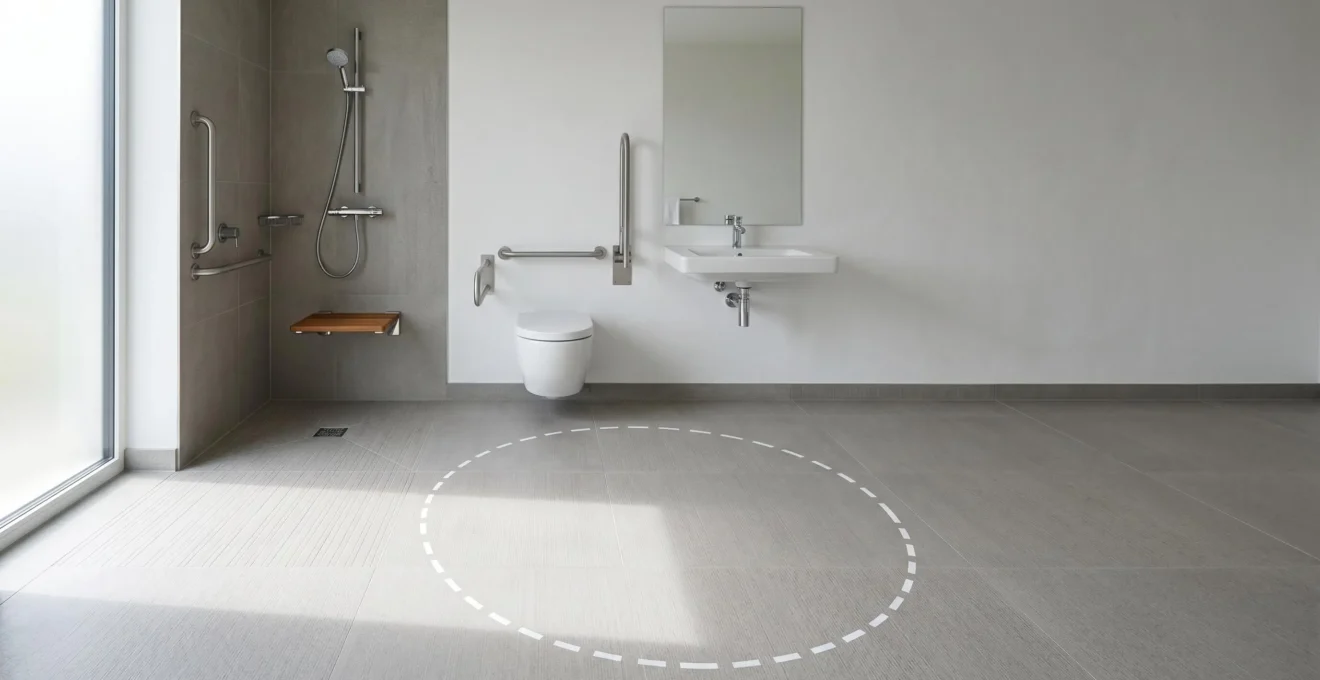
How to Create Seamless Floor Transitions Between Rooms for a Smooth Wheelchair Journey?
For a wheelchair user, the journey between rooms is as important as the flooring within them. An abrupt or poorly managed transition between different flooring types can be an obstacle, a trip hazard, or a source of daily frustration. Creating truly seamless, ‘zero-barrier’ transitions is a critical aspect of accessible design that requires precision during installation.
Any change in level, no matter how small, can catch a wheelchair’s front casters, bringing it to a sudden halt. UK Building Regulations provide clear guidance on this. For new accessible dwellings, a maximum 15mm threshold height for step-free access is mandated under Part M, M4(2) standards. However, for optimal accessibility, the goal should always be a transition that is as close to flush as possible.
This is often achieved using advanced installation techniques before the final flooring is even laid. The use of a feather-finish self-levelling compound allows an installer to perfectly match the subfloor heights of adjacent rooms, creating a completely flat plane. When joining different materials, such as safety vinyl in a bathroom to carpet in a hallway, specific low-profile transition strips designed for wheelchair access are used. These strips create a smooth, ramped edge that eliminates any vertical lip.
The image above demonstrates an ideal transition. There is no vertical barrier for a wheel to catch on, ensuring a smooth and effortless journey. This level of detail, addressing not just the surface but the joins between surfaces, is the hallmark of a properly specified and installed accessible floor.
Carpet, Vinyl or Cork: Which Flooring Reduces Fall Injuries Most?
While preventing falls with high-grip flooring is the primary goal, a comprehensive safety strategy also considers injury reduction in the event a fall does occur. This introduces a new variable into the flooring equation: impact absorption. A harder surface like porcelain tile offers excellent slip resistance and durability but provides zero cushioning. Softer surfaces can significantly reduce the severity of an injury, but this often comes at the expense of another critical factor for wheelchair users: rolling resistance.
High rolling resistance means more effort is required for a person to self-propel a manual wheelchair. Plush residential carpet, while offering the best impact absorption, can feel like pushing through sand and is exhausting for a wheelchair user. The ideal flooring strikes a balance between slip resistance, impact absorption, and low rolling resistance.
Rubber and cork flooring are excellent materials in this regard. As noted by one accessibility expert, their inherent properties make them a strong choice.
Rubber flooring is especially popular in homes with seniors or wheelchair users because it softens impact and resists water naturally.
– Oakley Home Access, 7 Best Slip-Resistant Bathroom Flooring Options
The following table, based on data comparing flooring safety characteristics, breaks down how different materials perform across these three competing priorities.
| Flooring Material | Slip Resistance (Prevention) | Impact Absorption (Injury Reduction) | Rolling Resistance for Manual Wheelchair |
|---|---|---|---|
| Safety Vinyl (Textured) | Excellent (PTV 36+) | Minimal (hard surface) | Low – Easy self-propulsion |
| Rubber Flooring | Exceptional (even when wet) | Good – Soft and cushioned underfoot | Moderate – Some energy absorption |
| Cork Flooring | Good (naturally grippy) | Moderate – Soft and warm underfoot | Moderate – Balanced performance |
| Low-Pile Commercial Carpet | Good (slip-resistant) | Moderate cushioning | High – Exhausting for manual users |
| Plush Residential Carpet | Excellent | Best impact absorption | Very High – Like pushing through sand |
For most situations requiring a balance, safety vinyl offers the best combination of high slip resistance and low rolling resistance, while materials like rubber or cork are superior choices where impact absorption is a higher priority than ease of propulsion.
The Porcelain Tile Mistake That Makes Italian Showers Hazardous
Italian-style wet rooms are a popular choice for accessible bathrooms, but their open-plan design makes correct tile specification absolutely critical. A common and dangerous mistake is to select tiles based purely on aesthetics or a misleading R-rating, ignoring the specific demands of a consistently wet and soapy environment where users are barefoot.
The primary error is failing to verify the tile’s PTV score when wet. Many stylish, large-format porcelain tiles may carry an R10 rating but will perform very poorly on a Pendulum Test once water is introduced, scoring well below the required PTV 36+. Another mistake is relying on grout lines between smaller tiles to provide grip. While grout lines can help, if the surface of the individual tiles is smooth or polished, the overall floor remains a high-risk surface, especially during transfers when a person’s feet are planted firmly on the tile itself.
Furthermore, installation errors can nullify the properties of even the best tiles. According to British Standard BS 5385, a wet room floor must have a sufficient gradient (typically 1:60 to 1:80) to ensure water drains effectively. An insufficient gradient leads to water pooling, which not only negates the slip-resistant properties of the tile but also encourages the growth of biofilm and limescale, further reducing grip.
To avoid these hazards, a rigorous selection and installation process is required. The following checklist outlines the critical points to verify before purchasing and installing tiles for a wet room.
Your Action Plan: Critical Tile Selection and Installation Checklist for a Wet Room
- Verify PTV Score: Never select tiles based solely on aesthetic and R-rating. Always obtain written confirmation of the PTV score when wet and soapy. Insist on a value of 36+ for barefoot areas.
- Assess Surface Texture: Do not rely on grout lines alone for grip. Ensure the individual tiles themselves have a tangible, textured matte finish. A smooth tile, regardless of size, is a hazard.
- Confirm Installer’s Gradient Plan: Before work begins, confirm with your installer that they will create the correct gradient as per UK standard BS 5385 to prevent water pooling.
- Balance Tile Size and Texture: Choose larger format tiles to minimise grout lines (which can be a trip hazard and are difficult to clean), but only if each individual tile has a certified high-PTV textured finish.
- Consider Chromatic Contrast: Select tile colours (e.g., grey, beige) that provide a sharp visual contrast with white sanitary ware (toilet, basin) to aid users with visual impairments and help prevent falls.
Key takeaways
- The UK benchmark for safety is a Pendulum Test Value (PTV) of 36+, which is a far more reliable measure for wet areas than a simple R-rating.
- Long-term durability for wheelchair use demands commercial-grade specifications: a 20+ mil wear layer for vinyl or a PEI rating of 4-5 for porcelain tiles.
- Maintaining slip resistance is non-negotiable. Use only pH-neutral, non-film-forming cleaners to prevent the build-up of a dangerously smooth surface layer.
Which Room in Your Home Contains the Most Hidden Fall Hazards?
The consequences of a fall for an older adult can be severe; data from the CDC shows that over 800,000 hospitalizations occur annually in the US due to such incidents. While the bathroom is correctly identified as a high-risk area due to water, conventional wisdom often overlooks the more subtle but equally dangerous hazards lurking elsewhere in the home. For a wheelchair user, the most significant risks are often found not in a single room, but along the high-traffic pathways between them.
Case Study: A ‘Journey-Based’ Fall Risk Assessment
A comprehensive safety audit should shift from a room-by-room focus to a ‘journey-based’ approach. This means analysing the most frequently travelled routes, such as the path from the bed to the toilet at night, or from a living room armchair to the kitchen. It is along these journeys that hidden hazards accumulate. These can include worn patches on flooring that have lost their texture, loose rugs or mats that can catch a wheel, uneven transitions between different floor types, and poor lighting that obscures minor defects or spills on the floor. Transfer zones, such as the area beside a sofa or bed where a person moves to and from their wheelchair, are also critical risk points where unexpected dips or worn surfaces can create instability.
This holistic perspective reveals that while the bathroom’s danger is obvious, the living room and connecting hallways often contain a greater number of hidden, cumulative risks. A single worn patch on a hallway vinyl floor or a slight ridge at a doorway can be just as hazardous as a wet shower floor. A true safety assessment, therefore, must consider the entirety of the user’s daily journey through the home, identifying and mitigating every potential point of failure along the way.
To ensure your home is truly safe, compliant, and supportive for a wheelchair user, the logical next step is to conduct a detailed ‘journey-based’ risk assessment. Evaluating every pathway, transition, and transfer zone with these technical principles in mind will allow you to create a genuinely accessible and secure living space.