In summary:
- The 1500mm wheelchair turning circle is the foundational principle of UK accessible bathroom design, but can be adapted with T- or Y-shaped spaces in constrained rooms with professional assessment.
- True safety in wet areas demands flooring that exceeds a simple R10 rating; look for combined R-ratings and ABC ratings for barefoot grip.
- Achieve a stylish, non-clinical aesthetic by using design-led solutions like wall-hung toilets with concealed cisterns, linear shower drains, and high-contrast finishes.
- Planning for future needs, including potential carer space and hoist requirements, from the outset is crucial to avoid costly retrofitting.
For a homeowner planning to convert a bathroom for a wheelchair user, the task can seem daunting. You’re faced with the reality of your existing space—often a compact bathroom in a typically-sized UK home—and a set of official-sounding rules from documents like ‘Approved Document M’. The most cited of these is the 1500mm wheelchair turning circle, a dimension that can feel impossible to achieve, leading to the fear that a safe, accessible bathroom will be clinical, ugly, and spatially unworkable.
Many guides will simply list these regulations, offering generic advice to « install grab rails » or « use non-slip floors ». This approach often fails to address the core challenge: how to reconcile the strict requirements with the aesthetic of your home and the specific, evolving needs of the user. It can leave you feeling that compliance is at odds with comfort and style.
But what if the key wasn’t simply to follow dimensions, but to understand the spatial logic behind them? This guide takes a different approach. We will decode the standards to reveal the principles of movement, transfer, and safety that underpin them. This is not just about meeting minimums; it’s about making intelligent, informed design choices that create a space that is not only compliant but also dignified, stylish, and future-proof.
Together, we will explore the core concepts you need to master. We will break down the real meaning of the turning circle, examine how to select fixtures that are both accessible and elegant, delve into the critical but often misunderstood details of drainage and floor safety, and consider how to plan for progressive mobility changes. This is your blueprint for creating a truly accessible bathroom that enhances independence and integrates seamlessly into your home.
Contents: Beyond the Tape Measure: What Are the True Dimensions of a UK Wheelchair-Accessible Bathroom?
- Why Does a 1500mm Turning Circle Determine Your Entire Bathroom Layout?
- How to Choose a Stylish Accessible Toilet That Does Not Look Clinical?
- Vertical, Horizontal or Angled Grab Rails: Which Configuration Helps Most When Transferring?
- The Drainage Gradient Mistake That Floods New Wet Rooms Within Months
- When Should You Factor Carer Space into Your Accessible Bathroom Design?
- Level-Access Shower vs Wet Room: Which Suits Progressive Mobility Loss Better?
- Why Does an R10 Rating Not Guarantee Safety in a Wet Shower Area?
- Why Are Italian Showers Considered the Gold Standard for Accessible Bathrooms?
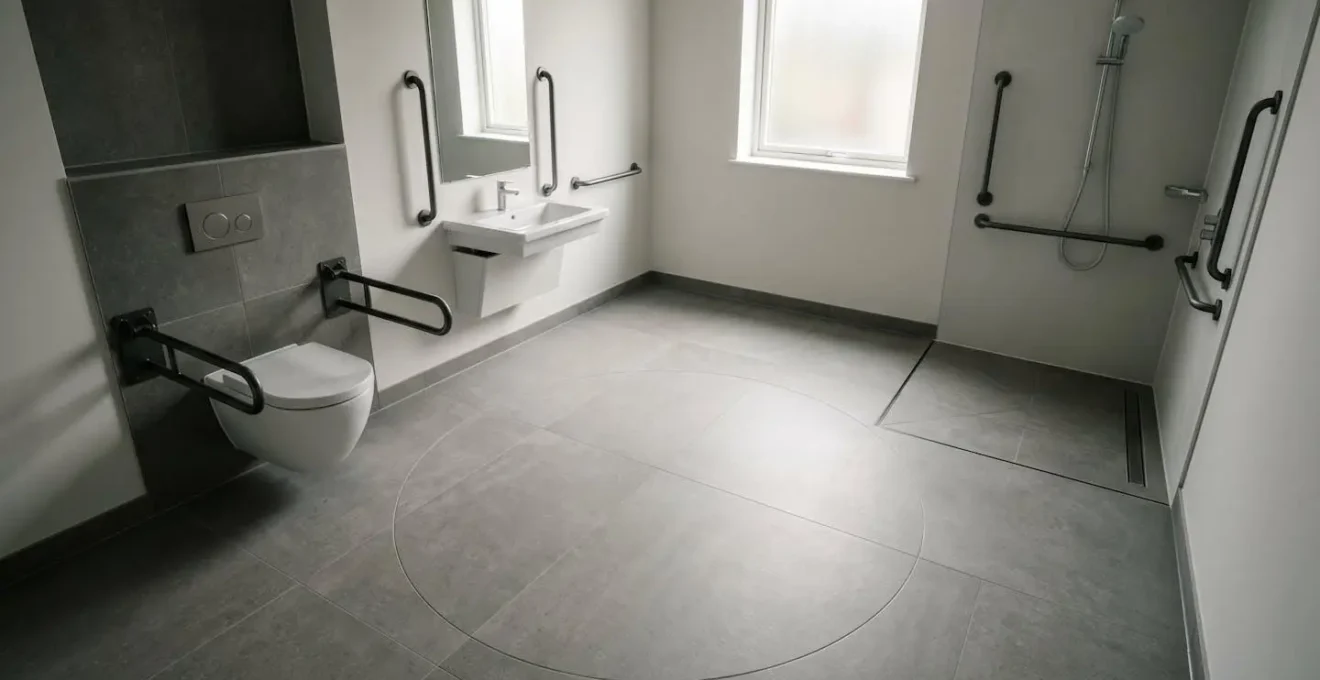
Why Does a 1500mm Turning Circle Determine Your Entire Bathroom Layout?
The 1500mm turning circle is the cornerstone of accessible design as defined by the UK’s Building Regulations Approved Document M. It is not an arbitrary number; it represents the minimum clear floor space required for an average wheelchair user to turn 360 degrees without needing to shunt back and forth. This single manoeuvre is fundamental to independence, allowing a person to enter, use the facilities, and exit without assistance. Therefore, every other element in the bathroom—the toilet, basin, and shower—must be positioned around this inviolable zone of movement.
For a fully compliant accessible wet room, the regulations go further. According to UK Building Regulations Document M, the minimum dimensions for the entire room are specified to ensure this turning circle can be accommodated alongside all necessary fixtures. The ideal starts at 2400mm x 2200mm, with a more comfortable layout achieved in a room of 2500mm x 2400mm. This space allows the turning circle to remain unobstructed, even with the door opening inwards.
However, in the context of converting a bathroom in a typical UK property, such as a narrow Victorian terrace or a 1960s semi-detached, achieving a perfect 1500mm circle is often the biggest challenge. This is where understanding the *principle* behind the rule becomes critical. UK housing adaptation studies show that local councils and occupational therapists can approve alternative layouts. In constrained spaces, a T-shaped or Y-shaped turning area can provide the necessary clearance for a wheelchair user to manoeuvre effectively, even if a full 360-degree turn isn’t possible in one spot. This practical approach, supported by a professional assessment, allows for compliant and functional designs in spaces that would otherwise seem too small.
How to Choose a Stylish Accessible Toilet That Does Not Look Clinical?
The fear that an accessible bathroom will inevitably resemble a hospital ward is a primary concern for homeowners. The toilet, being a central fixture, is often the main source of this anxiety. Fortunately, « accessible » no longer has to mean « institutional ». The key is to embrace design-led compliance, where accessibility features are integrated as intentional, high-end design elements rather than functional afterthoughts.
One of the most effective strategies is to opt for a wall-hung toilet with a concealed cistern system. This choice immediately elevates the aesthetic, creating clean lines and a sense of space by lifting the pan off the floor. Crucially, it also offers a significant accessibility advantage: the installation frame allows the toilet pan to be set at a precise, customised height to meet the specific transfer needs of the user, something a standard close-coupled toilet cannot offer.
Further enhancing both style and independence can be achieved by integrating a smart wash-and-dry toilet. These units, which combine washing and drying functions, drastically reduce the need for physical assistance with personal hygiene, promoting dignity while presenting a modern, high-tech appearance. To complete the look, select design-led grab rails that serve dual functions, such as integrated towel holders, and choose finishes like brushed brass or matte black that complement your decor rather than clash with it. By applying these design principles, the accessible toilet becomes a seamless part of a luxurious and contemporary bathroom design.
Vertical, Horizontal or Angled Grab Rails: Which Configuration Helps Most When Transferring?
Grab rails are arguably the most critical safety feature for facilitating transfers, but simply installing a rail is not enough. The correct configuration—vertical, horizontal, or angled—is entirely dependent on the user’s specific transfer method and physical abilities. A one-size-fits-all approach is not only ineffective but can be dangerous. An Occupational Therapist (OT) assessment is vital for determining the optimal setup, but understanding the functional principles of each type is key for any homeowner.
The placement and orientation of grab rails provide different types of mechanical advantage:
- Standing Pivot Transfer: For a user who can stand and pivot, a vertical rail is essential. Positioned on the transfer side, it allows the user to use a pulling motion to get into a standing position. This is often paired with a horizontal rail on the opposite wall for stability during the pivot.
- Sliding Board Transfer: For users who cannot bear weight on their legs, the transfer relies on upper body strength. Two parallel horizontal rails, one on each side of the toilet, allow the user to push down through their arms, lifting their body to slide across a transfer board.
- Forward Approach Transfer: Users with weak wrists may struggle to grip horizontal or vertical rails. In this case, angled rails positioned in front of the toilet allow the user to support their forearm along the rail while pushing up, distributing the load and reducing strain on the wrist joint.
Proper installation is as crucial as configuration. Improper mounting is a significant safety risk. In the UK, The Royal Society for the Prevention of Accidents reports that 73% of grab rail-related accidents in homes are due to rails pulling away from the wall because of incorrect fixings or installation. This statistic underscores the absolute necessity of professional installation into a securely reinforced wall structure, ensuring the rails can withstand the dynamic forces exerted during a transfer.
The Drainage Gradient Mistake That Floods New Wet Rooms Within Months
A perfectly level, step-free shower area is the hallmark of a modern accessible bathroom, but its success or failure hinges on an invisible detail: the drainage gradient. An incorrectly formed « fall » is the single most common mistake in wet room construction, leading to standing water, leaks, and potentially catastrophic water damage. The choice between a traditional point drain and a modern linear drain has profound implications for the gradient, the tile choice, and the overall success of the project.
A central point drain requires the floor to be sloped from all four directions towards the centre, like an inverted pyramid. This complex, four-way fall makes it almost impossible to use large format tiles, as they cannot conform to the multiple slopes. Installers are forced to use small, mosaic-style tiles, which can contribute to a more clinical, dated look. In contrast, a linear drain, typically placed along one wall, requires only a single, gentle slope in one plane towards the drain. This simple, single-plane gradient is far easier to construct accurately and allows for the use of large, contemporary tiles, maintaining a seamless and modern aesthetic throughout the bathroom.
The table below, based on UK wet room standards, highlights the key performance differences. It demonstrates why linear drains are overwhelmingly preferred for high-performance, design-led accessible wet rooms.
| Feature | Linear Drain | Point Drain (Central) |
|---|---|---|
| Gradient requirement | Single-plane slope (1:40 minimum to 1:60 optimal) | Four-way slope from all walls |
| Tile size compatibility | Accommodates larger format tiles (600x600mm+) | Requires smaller tiles (300x300mm) for accurate fall |
| Floor joist compatibility | Works with parallel joist runs, installed between joists | Requires reinforced intersection point, complex framing |
| Wheelchair access | Flush installation, no ridge or bump | Can create slight depression at center |
| Flow capacity | Higher flow rate (28-40 litres/min typical) | Lower flow rate (18-25 litres/min typical) |
| Installation cost (UK average) | £800-£1,200 for quality system | £400-£700 for quality system |
While a linear drain system has a higher upfront material cost, failing to plan for proper drainage from the start can be far more expensive. Data shows that trying to make accessibility adaptations to a project already underway is a false economy. In fact, retrofitting Part M accessibility requirements mid-project can increase structural costs by up to 15%, a cost that is easily avoided with proper initial design.
When Should You Factor Carer Space into Your Accessible Bathroom Design?
When designing an accessible bathroom, it is crucial to think beyond the immediate needs of the user. A key element of progressive future-proofing is considering the potential need for carer assistance. Even if a user is fully independent now, a progressive condition may mean that one-person, two-person, or even hoist-assisted transfers become necessary later. Factoring in this « carer space » from the outset is a smart, compassionate design choice that prevents the need for disruptive and expensive re-adaptation in the future.
Designing for a carer involves more than just adding space; it’s about planning clear, ergonomic zones of activity. A minimum of 900mm of clear space to one side of the toilet is the standard for one-person assistance. This allows a carer to stand and assist with a transfer without being obstructed. For two-person transfers or for the use of mobile hoists, the space requirements increase significantly, often needing clear zones on two sides of the toilet and a larger overall floor area to allow for safe manual handling and equipment manoeuvring.
For UK homeowners, funding support is available for such essential adaptations. Through the local council, you can apply for a Disabled Facilities Grant (DFG), a means-tested grant to help with the costs of adapting a home. Recognizing the growing need, the UK government has set the allocation for Disabled Facilities Grants for 2024-25 and 2025-26 at £711 million, demonstrating a commitment to supporting independent living. Planning for carer space is a key justification when applying for a DFG, as it demonstrates foresight in creating a sustainable, long-term living solution.
Action Plan: Auditing Your Bathroom for Carer Space
- Identify Touchpoints: List all activities that currently require or may soon require carer assistance (e.g., toilet transfer, showering, dressing, hoist operation).
- Collect Dimensions: Inventory your current bathroom layout. Measure the clear floor space beside the toilet and shower, document door widths, and identify any potential obstructions (e.g., radiators, vanity units).
- Check for Coherence: Compare your collected dimensions against the minimum requirements for different levels of care (e.g., 900mm side clearance for one carer, 1200mm for two carers) to identify spatial deficits.
- Assess Safety & Dignity: Review the layout to spot high-risk areas (e.g., tight corners for a hoist, insufficient support near the toilet) versus zones that promote safe handling and user dignity.
- Create an Integration Plan: Prioritise modifications based on your audit. Determine which changes are essential now (e.g., removing a vanity to create side-transfer space) and which are for future-proofing (e.g., reinforcing the ceiling for a potential track hoist).
Level-Access Shower vs Wet Room: Which Suits Progressive Mobility Loss Better?
The terms « level-access shower » and « wet room » are often used interchangeably, but they represent two distinct design approaches with different implications for long-term accessibility. A level-access shower features a pre-formed tray that sits flush with the bathroom floor. While it eliminates the step of a conventional shower, it is still a defined, tray-based system. A true wet room, by contrast, does away with the tray entirely. The entire floor is tanked (waterproofed) and tiled, with the gradient for drainage built directly into the floor structure itself.
For a user with progressive mobility loss, the wet room is unequivocally the superior long-term solution. The level-access tray, while low-profile, still has edges and a defined footprint. This can present a minor but significant obstacle for a shuffling gait or the small front castors of a wheelchair. A wet room provides a completely seamless, uninterrupted floor surface. This total freedom of movement is invaluable as needs change, allowing a wheelchair to be rolled directly into the shower, or providing unrestricted space for a carer to assist, without having to navigate the perimeter of a shower tray.
Creating these fully accessible spaces is a pressing need in the UK. The stark reality is that our housing stock is ill-prepared for an ageing population. According to the English Housing Survey Homes Report, only 7% of homes in England have even the most basic accessibility features, such as a level entrance and a ground-floor toilet. This deficit highlights the importance of making the right long-term choices when undertaking an adaptation. Opting for a full wet room over a simpler level-access tray is a key decision in future-proofing a home for decades to come.
Key Takeaways
- The 1500mm turning circle is a principle of independent movement, not an immovable dimensional obstacle; work with an OT to explore alternatives like T-shaped spaces if necessary.
- True wet area safety comes from flooring rated for barefoot and wet conditions (e.g., R11 + a high ABC rating), not just a standard dry R10 rating.
- Strategic choices in fixtures (wall-hung toilets, linear drains) and finishes (LRV contrast) are the key to combining strict compliance with high-end style.
Why Does an R10 Rating Not Guarantee Safety in a Wet Shower Area?
Specifying « non-slip flooring » is standard practice, but relying solely on an R-rating can create a false sense of security, particularly in a wet room. The ‘R’ stands for ‘ramp test’, a shod-boot test that measures slip resistance on an oiled surface. An R9 or R10 rating might be sufficient for a general kitchen or bathroom floor, but it is wholly inadequate for the standing area of a shower, which will be wet, soapy, and used by someone with bare feet.
For a truly safe wet area, you need to look for two additional specifications. Firstly, a higher R-rating, such as R11 or above. Secondly, and more importantly, you need to check for an A, B, or C rating. This is a separate test, conducted on a ramp with bare feet and water, which is far more representative of a shower environment. A ‘C’ rating represents the highest level of slip resistance in these conditions. Therefore, the gold standard for a domestic accessible shower is a tile or vinyl flooring that specifies both a high R-rating (R11+) and an A, B, or C rating.
Furthermore, slip resistance is only one facet of flooring safety. For individuals with visual impairments, a frequent comorbidity with mobility issues, the Light Reflectance Value (LRV) of surfaces is critical. As the accessibility experts at Fitzroy of London state:
Contrast plays a vital role in making washroom spaces more navigable for individuals with visual impairments.
– Fitzroy of London Accessibility Research Team, Breaking Down the Latest UK Disability Statistics
Document M recommends a difference of at least 30 points in LRV between adjacent surfaces (e.g., floor and wall) to help define the space. This is not just a regulatory footnote; it is a vital design tool for safety. A dark floor against a light wall provides a clear visual horizon, helping to prevent falls and improve confidence. With around 16 million people with a disability in the UK (24% of the population), designing for all sensory and physical needs is a societal imperative.
Why Are Italian Showers Considered the Gold Standard for Accessible Bathrooms?
The « Italian shower » is more than just a style; it represents a design philosophy that perfectly aligns with the highest ideals of accessibility. It is essentially a beautifully executed wet room, characterized by a completely seamless floor, a wall-mounted or ceiling-mounted shower, and minimalist glass screens. This approach is considered the gold standard because it inherently delivers maximum accessibility without compromising on luxury or aesthetics. It is the ultimate expression of design-led compliance.
The core benefit is the total elimination of barriers. With no tray or threshold, an Italian shower offers unrestricted access for a wheelchair user and ample space for a carer to assist. The use of large-format tiles, made possible by a single-plane gradient sloping to a linear drain, creates a visually expansive and easy-to-clean surface that feels modern and luxurious. This design intrinsically solves the accessibility challenge while simultaneously achieving a high-end, hotel-like aesthetic that actively combats the institutional feel many people fear.
Case Study: Fife Council’s Life-Changing Installation
A resident in her 60s with arthritis and bowel issues found her reliance on carers for personal hygiene was diminishing her independence. Fife Council transformed her standard bathroom by installing a full « Italian-style » wet floor shower and a smart wash-and-dry toilet. The seamless floor eliminated all transfer barriers for showering, while the advanced toilet restored her ability to manage her own hygiene. The resident’s fear of an « institutional » look was replaced by the reality of a modern, hotel-like bathroom that significantly boosted her dignity and reduced her need for carer support, showcasing the profound human impact of a well-designed accessible space.
The need for such solutions is widespread. A recent survey highlights the scale of the challenge within our homes. A YouGov survey commissioned in April 2024 shows that 25% of UK adults over 50 report difficulties with bathing in their own homes. The Italian shower concept directly addresses this by creating a space that is not just adapted, but universally better, safer, and more pleasant for everyone to use, regardless of their mobility level.
Now that you understand the key principles of spatial logic, safety, and future-proofing, the next step is to apply them. Begin by measuring your own space, sketching a potential layout, and using this guide as your reference to create a bathroom that is not just compliant, but truly liveable, dignified, and liberating.