A true Italian shower transforms a bathroom into a seamless, accessible, and luxurious space, but its elegance is built on non-negotiable engineering hidden beneath the tiles.
- Success depends on an integrated system of structural floor lowering, comprehensive waterproofing, and precise drainage gradients.
- The choice of tile and drain type is not merely aesthetic; it is a critical safety decision that dictates slip resistance and long-term usability.
Recommendation: Treat the installation not as a simple tiling job, but as a specialised construction project. Prioritise technical expertise over superficial appearance to ensure safety and prevent catastrophic failures.
The term « Italian shower » evokes images of minimalist luxury—a sleek, seamless transition from bathroom floor to showering space. For UK homeowners exploring accessibility options, it presents an aspirational alternative to the clinical-looking equipment of the past. It promises style, dignity, and effortless use. But this effortless appearance is a masterful illusion, a triumph of sophisticated design and uncompromising technical execution.
Many articles will tell you it’s about being « curbless » or « choosing nice tiles. » This is a dangerously incomplete picture. The reality is that the most critical elements of a successful Italian shower are entirely invisible. They exist in the structural preparation of the floor, the multi-layered waterproofing membranes, and the precise, millimetre-perfect gradients that guide water to its destination. These are not just details; they are the fundamental principles that separate a truly safe and durable wet room from a ticking time bomb of leaks, mould, and hazardous surfaces.
This is where the real conversation begins. To understand the gold standard, we must look past the polished surface and into the below-the-tile engineering. This guide is not about choosing colours; it’s about understanding the architectural and safety decisions that make an Italian shower the ultimate solution for accessibility. We will deconstruct the process, revealing the common mistakes and the expert techniques required to create a space that is not only beautiful but fundamentally safe and built to last.
To navigate the complexities of this project, we will break down the essential technical considerations. This article details the structural, waterproofing, and finishing choices that define a true Italian shower, ensuring you are equipped to make informed decisions.
Summary: The Engineering Behind the Elegance of an Italian Shower
- Why Does Your Floor Need Structural Lowering for a True Italian Shower Installation?
- How to Waterproof an Italian Shower to Prevent Leaks into the Room Below?
- Linear Drain vs Central Drain: Which Suits a Modern Italian Shower Better?
- The Porcelain Tile Mistake That Makes Italian Showers Hazardous
- When Should You Install an Italian Shower to Minimise Disruption for Someone Who Needs Daily Assistance?
- The Drainage Gradient Mistake That Floods New Wet Rooms Within Months
- The Cleaning Product Error That Makes Anti-Slip Floors Dangerously Smooth
- What Slip Resistance Rating Should Bathroom Flooring Have for a Wheelchair User?
Why Does Your Floor Need Structural Lowering for a True Italian Shower Installation?
A true Italian shower is defined by its seamless, level-access entry. This isn’t achieved by simply laying tiles on the floor; it requires creating a recessed area for the shower tray and drainage system to sit flush with the surrounding floor. Historically, this meant the disruptive and structurally compromising act of cutting into the floor joists. This is a significant intervention, requiring expert assessment to avoid weakening the floor’s integrity. It’s an approach that should only be undertaken with extreme caution and professional oversight.
However, modern methods provide a more intelligent solution that avoids this structural risk. The philosophy has shifted from « building down » to « building up. » Instead of cutting joists, a specialised, pre-formed shower pan can be installed *between* them, sitting on supportive blocking. The rest of the bathroom floor is then built up slightly with an additional layer of subfloor to meet the height of the shower pan’s edge. This creates the level-access finish without compromising the home’s structure. This method not only preserves structural integrity but also often simplifies the installation process.
Case Study: The VIM Level Entry Shower System Approach
An excellent example of this modern approach is the VIM Level Entry Shower System. It demonstrates an innovative alternative to cutting floor joists by recessing the shower pan between the joists using a blocking process. The rigid, compression-resistant pan sits just 1/8 inch above the subfloor and is backed by a 10-year system warranty. This method effectively eliminates structural failure risks while simultaneously strengthening the floor system’s load-bearing capacity, making it an ideal integrated system for accessible design.
Ultimately, achieving that flawless, flush finish is a game of millimetres. Whether by carefully recessing the floor or using advanced pan systems, this foundational step is a non-negotiable part of the below-the-tile engineering that defines a high-quality, safe Italian shower.
How to Waterproof an Italian Shower to Prevent Leaks into the Room Below?
An Italian shower, or wet room, is essentially a fully tanked, watertight box. Unlike a traditional shower tray that contains water in a defined area, here the entire room’s structure is the primary defence against leaks. A single pinhole, a poorly sealed corner, or an improperly flashed drain can lead to catastrophic water damage, affecting not only the bathroom but potentially the ceiling and room below. This makes the waterproofing stage the single most critical phase of the installation. It’s an integrated system of membranes, sealants, and backing boards that must be flawlessly executed before a single tile is laid.
Modern waterproofing relies on either liquid-applied membranes painted over cement backer boards or pre-manufactured sheet membranes. Both systems require meticulous attention to detail, especially at the most vulnerable points: corners, seams, and around the drain assembly. Every joint must be reinforced with fleece or tape, and the drain itself must be integrated into the membrane system with a clamping ring or proprietary flange. This creates a continuous, unbroken barrier, turning the shower area into a monolithic, sealed basin.
Before tiling, the integrity of this waterproof system must be verified. The only way to do this with certainty is to conduct a flood test. This involves plugging the drain and filling the shower area with water for a minimum of 24 hours. It’s a moment of truth that confirms the quality of the work and provides peace of mind. Skipping this test is gambling with the structural health of your home; a professional installer will insist upon it.
Your Pre-Tiling Flood Test Checklist
- Inspect the waterproofing membrane and flashings for any visible deficiencies and repair them before starting the test.
- Plug all drains securely with suitable containment devices like inflatable plugs or watertight seals.
- Fill the test area with water to achieve a minimum depth of 1 inch (2.5 cm), but no more than 4 inches (10 cm), at its lowest point.
- Ensure the water level remains at least 2 inches (5 cm) below the top edge of any flashings to prevent overflow.
- Monitor the water level for a minimum of 24 hours. If any leakage is detected, immediately drain the area, find the source, repair it according to manufacturer recommendations, and then re-test the entire system.
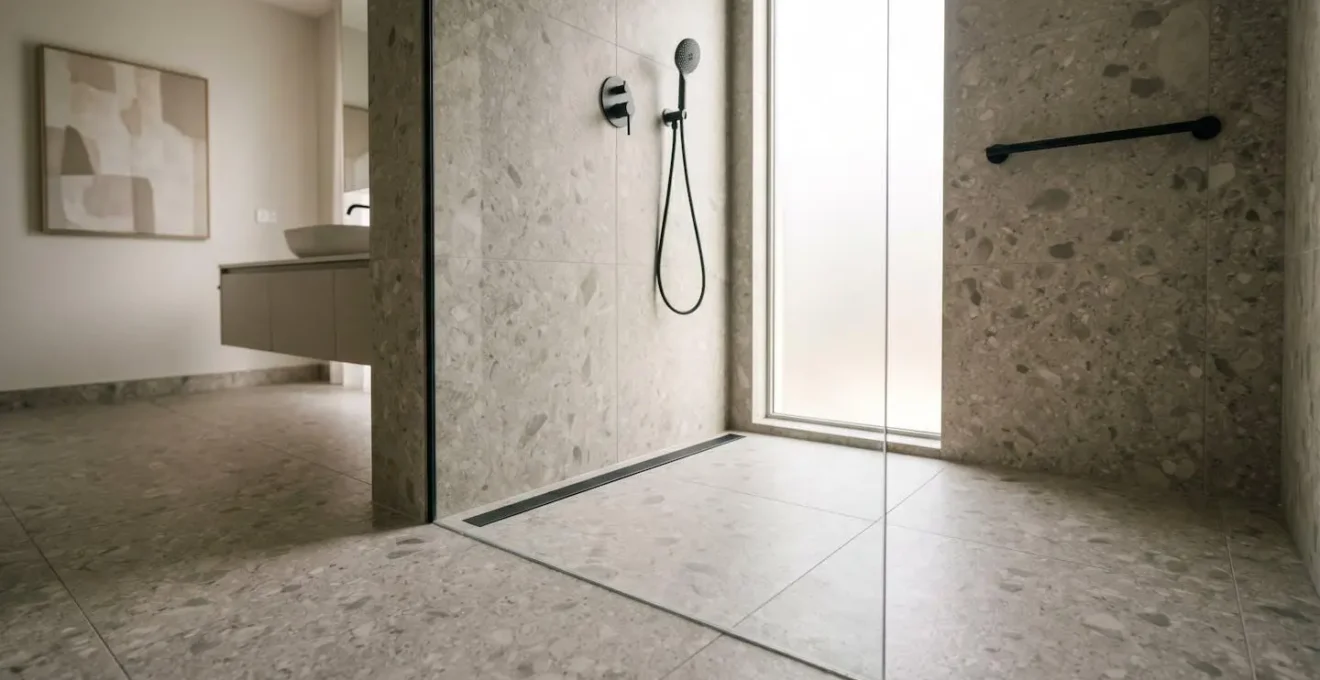
Linear Drain vs Central Drain: Which Suits a Modern Italian Shower Better?
The drain is the functional heart of an Italian shower, and its choice has profound implications for aesthetics, accessibility, and the complexity of the installation. The debate between a traditional central drain and a modern linear drain is about much more than looks; it’s a decision that dictates the entire geometry of the shower floor. A central drain requires the floor to be sloped from all four directions towards the middle, creating a subtle, funnel-like shape. This necessitates the use of small-format tiles (typically no larger than 2×2 inches) that can conform to this complex, multi-directional slope.
A linear drain, by contrast, changes the entire equation. Placed at one end of the shower, it requires only a single, gentle slope in one direction. This is a game-changer for both design and accessibility. This single-plane slope means you can use beautiful, large-format tiles, creating a cleaner, more contemporary look with fewer grout lines to clean. More importantly for accessibility, it creates a completely uniform, uninterrupted surface, which is far safer and more comfortable for a wheelchair user or someone with mobility challenges. There’s no need to navigate over a central grate.
As the QuickDrain Industry Guide, featured in an Oatey blog, notes, this is a key factor for universal design:
Linear drains are the ideal solution for creating ADA-compliant showers and wet spaces that are universally accessible. With only one slope and no barrier to cross, the floor more easily accommodates a freestanding bench, a wheelchair, or some other mobility aid.
– QuickDrain Industry Guide, Oatey Blog – Linear vs. Center Square Drains
While a central drain might have a lower initial cost for the component itself, the linear drain often proves superior in the long run for an accessible Italian shower. Its benefits in safety, comfort, and design flexibility are undeniable.
This comparison from an analysis by plumbing specialists Oatey highlights the key differences:
| Feature | Linear Drain | Center Drain |
|---|---|---|
| Floor Slope Direction | Single-plane slope (one direction) | Four-way slope (toward center) |
| ADA Compliance | Ideal for ADA-compliant showers | Challenging for accessibility |
| Tile Installation | Allows large-format tiles, fewer cuts | Requires smaller tiles (typically 2×2 max) |
| Maintenance Access | Easier to clean, accessible from edge | User must stand on drain to clean |
| Initial Cost | Higher ($200+ for drain) | Lower ($20-$50 for drain) |
| Standing Comfort | Uniform surface, drain at wall edge | User stands directly on drain grate |
The Porcelain Tile Mistake That Makes Italian Showers Hazardous
Choosing a tile for an Italian shower based solely on its colour and style is one of the most dangerous mistakes a homeowner can make. In a wet, soapy environment, the floor’s surface is the primary interface for safety, and its frictional properties are a matter of scientific specification, not just looks. A beautiful, glossy porcelain tile that looks stunning in a showroom can become a treacherous skating rink when wet. This is where understanding the concept of Dynamic Coefficient of Friction (DCOF) becomes non-negotiable.
DCOF is the industry standard for measuring a tile’s slip resistance when wet. It’s a value that quantifies the « grip » a surface provides. According to international standards like ANSI A137.1, tile flooring products intended for wet areas must have a minimum DCOF of 0.42. Anything less is considered unsuitable and potentially hazardous. When selecting a tile, you must look beyond the sample board and find the product’s technical specification sheet. The DCOF rating should be clearly stated. This is not a suggestion; it’s a critical safety requirement.
The size of the tile also plays a crucial role in the friction science of the shower floor. As Daltile’s technical experts point out, there is a direct relationship between tile size and safety:
Tile size can be a factor for slip resistance in wet areas. Smaller sizes allow for more drainage through an increased number of grout joints and easier sloping.
– Daltile Technical Standards, DCOF AcuTest: Testing Slip Resistance
This creates a design paradox. While linear drains allow for large-format tiles aesthetically, using smaller, textured tiles (or a mosaic finish) within the shower area can increase safety by adding more grout lines, which act as channels for water and create additional grip. The ideal solution often involves using a large-format tile for the main bathroom floor and a coordinating, smaller, or more highly-textured tile with a high DCOF rating within the wet zone itself.
When Should You Install an Italian Shower to Minimise Disruption for Someone Who Needs Daily Assistance?
The decision to install an Italian shower is often prompted by a change in health or a proactive desire to « age in place. » However, the timing of the renovation itself is a critical, often overlooked, factor, especially when the intended user requires daily care and has limited mobility. For a person who is frail or living with cognitive challenges like dementia, a major construction project in their primary bathroom can be profoundly disruptive and stressful. The noise, dust, and presence of unfamiliar people can be overwhelming. Furthermore, losing access to the main washing facility, even for a few days, presents a significant logistical challenge.
The statistics on bathroom safety underscore the urgency. With about 80% of all bathroom injuries for seniors caused by falls, a renovation is often not a luxury but a necessity. The key is to plan the project with a « person-first » approach. This means establishing a temporary, safe washing station elsewhere in the home *before* any demolition begins. This could be a commode chair with washing facilities or adapting a downstairs cloakroom. It’s also crucial to schedule the loudest and most disruptive work (like demolition and cutting) for times when the user is out of the house, perhaps at a day centre or with family.
A successful project in this context involves more than just technical skill; it requires empathy and careful planning. The installer should be a consistent point of contact, minimising the stress of new faces. The timeline needs to be realistic, and the decision to renovate should be made with a clear understanding of the user’s long-term needs. Is this a preventative measure for active ageing, or is it an urgent adaptation to a specific physical disability? The answer will determine the scope and features of the ‘age in place’ or ‘accessible’ shower, ensuring the investment provides safety and comfort for years to come.
The Drainage Gradient Mistake That Floods New Wet Rooms Within Months
Of all the « invisible » engineering in an Italian shower, the floor gradient is the most unforgiving. Get it right, and water flows away effortlessly. Get it wrong, and you create a perpetual state of puddles, poor drainage, and a constant risk of water escaping the designated wet area. This isn’t about a visibly dramatic slope; it’s a subtle, precisely engineered incline that guides water towards the drain. A floor that looks perfectly flat to the naked eye is a major red flag and a common point of failure.
The industry standard for this is clear and non-negotiable. Both plumbing codes and tile-setting bodies mandate a minimum slope to ensure effective drainage. As specified by organisations like the Ceramic Tile Foundation, the shower floor must have a minimum slope of 1/4 inch of fall for every vertical foot of run (a 2% slope). This means for every foot you move away from the drain, the floor should be 1/4 inch higher. This seemingly small gradient is enough to overcome water’s surface tension and guide it effectively, preventing it from pooling or flowing backwards into the dry area of the bathroom.
Achieving this perfect, consistent slope is a mark of true craftsmanship. It’s formed in the mortar bed beneath the waterproofing membrane, long before any tiles are set. An inexperienced installer might create an uneven « birdbath » effect with low spots where water collects, promoting mould growth and creating a slip hazard. A true professional will use levels and screeds to build a perfectly planar slope that is both effective and comfortable underfoot. This meticulous preparation is what ensures your beautiful wet room functions as intended for decades, rather than becoming a waterlogged problem within months.
Key Takeaways
- A true level-access shower requires structural floor preparation; simply tiling is not enough and can be dangerous.
- Absolute, test-verified waterproofing is the most critical stage. Any shortcut here will lead to catastrophic failure.
- The slip resistance of a tile (its DCOF rating) is a non-negotiable safety specification, not an aesthetic preference.
The Cleaning Product Error That Makes Anti-Slip Floors Dangerously Smooth
You have invested in the perfect high-friction, textured tile with an excellent DCOF rating. Your Italian shower is, by design, fundamentally safe. However, this safety can be completely undone in a matter of weeks by using the wrong cleaning products. Many common household bathroom cleaners, especially those that promise a « shiny » finish or contain oils, waxes, or « moisturising » agents, are the sworn enemy of slip resistance. These products work by leaving behind a microscopic polymer film on the surface. On a glossy tile, this makes it gleam; on a textured, anti-slip tile, it fills in the vital micro-texture, effectively turning it into a smooth, dangerously slippery surface.
This is a slow, insidious process. You won’t notice the change overnight, but with each clean, the floor’s grip is gradually diminished. The very feature you paid a premium for is being systematically destroyed. The same applies to overly harsh chemicals. Highly acidic cleaners used for limescale or highly alkaline products like bleach can, over time, etch the surface of the tile, altering its factory-rated finish and compromising its slip resistance. Restoring a floor that has been compromised by improper cleaning is possible, but it requires a dedicated effort to strip away the built-up residue.
The only way to maintain safety is through a disciplined maintenance regimen using appropriate products. The goal is to clean the tile without leaving any residue. Here is a simple protocol for maintaining or restoring your tile’s grip:
- Immediately stop using any products containing silicones, oils, waxes, or film-forming agents.
- Choose a pH-neutral, non-film-forming detergent specifically designed for textured porcelain or ceramic tiles.
- Use a stiff-bristled (never wire) brush to scrub the floor, dislodging any soap scum or biofilm from the tile’s texture.
- Rinse the floor thoroughly with clean water to remove all traces of the cleaning solution. Any remaining residue can itself become a slip hazard.
As technical guides from tile manufacturers often state, « Oils, lotions, or powdered cleaners can lower traction, so plan for finish, maintenance, and footwear together. » Your floor’s safety is an ongoing commitment, not a one-time installation feature.
What Slip Resistance Rating Should Bathroom Flooring Have for a Wheelchair User?
When designing an accessible bathroom for a wheelchair user, the standard safety metrics must be elevated. The dynamics of a person walking are very different from those of a wheeled mobility device. Wheelchairs concentrate pressure on small contact points, and any loss of traction during transfers or manoeuvres can have serious consequences. Therefore, relying on the general minimum DCOF rating is not sufficient. We must look to a higher standard of friction science to ensure absolute safety.
For general accessible bathroom areas, a DCOF of 0.42 is the absolute minimum, but best practice pushes this higher. However, inside the wet zone of the Italian shower, where water, soap, and the movements of a carer and wheelchair are combined, the demands are much greater. Here, a more stringent specification is required. Industry best practices and safety-grade specifications recommend a DCOF of 0.50 or higher for general accessible bathroom areas, but this should be increased to 0.60 or higher for the shower zone itself. This provides an essential margin of safety, accounting for the dynamic forces at play.
This rating is typically found on commercial-grade porcelain or ceramic tiles specifically engineered for demanding environments like public swimming pools, commercial kitchens, and healthcare facilities. These tiles often feature a more pronounced, abrasive texture. While the aesthetic choice might be more limited than in the decorative residential market, safety must be the overriding priority. The selection process must be rigorous: always obtain the official technical data sheet for any proposed tile and verify that the DCOF rating meets or exceeds this 0.60 threshold for the wet area. In accessible design, there is no room for ambiguity or assumptions when it comes to slip resistance.
To ensure your bathroom is not just beautiful but truly safe and functional for years to come, every one of these technical details must be executed with precision. The most logical next step is to engage with a designer or installer who understands this integrated systems approach.